¶ 4. Measurements Configuration
This guide helps to configure measurements in the installed RENergetic system. A measurement is a single time series, i.e. a sequence of values changing over time. These values are stored in the system after being provided by users using the Ingestion API or are calculated internally by the system. The metadata has to be configured appropriately for all the time series data such that the system can use it properly.
¶ Measurements Type
The measurement type describes the physical quantity represented by a time series along with its unit. This is a user-defined key (name can be anything relating to the physical quantity) inside the "fields" object. For example, if the data contains electrical energy values expressed in kWh, its measurement type is "energy_kwh". Other examples are listed below:
- power_kw
- temperature
- energy_gj
- mass_kg
Measurement types without a unit in the name have a default unit assigned (e.g., °C for temperature). The name for the measurement types need to be given. For example, "energy_kwh" can be a key inside the "fields" object. The name of the measurement should give an idea about the type of physical quantity it stores.
¶ Tags
Each measurement can have a set of tags assigned to it. Each tag is a key-value pair that describes the measurement metadata. The RENergetic system uses the following tags:
-
asset_name (mandatory) - name of the asset related to the measurement.
-
direction (optional) - indicates whether the measurement concerns generation (the tag value is "out"), consumption ("in") or neither ("none").
-
domain (optional) - "heat" or "electricity"
-
type_data (optional) - allows to distinguish if the data contains data points provided by users ("real"), calculated by the system ("calculated"), forecasted ("forecasting") or artificially generated ("simulated").
-
measurement_type (mandatory; Not the same as the measurement type described in the previous section!) - the name of the measurement, usually a physical quantity in a general form (for example "temperature") or in a more specific form (for example "outdoor_air_temperature") that allows similar measurements to be distinguished (for example air and soil temperatures from a single weather station). In other words, here, "measurement_type" is a key inside the "tags" object, whose value is a physical quantity like "energy", "temperature", etc.
-
predictive_model (optional) - name of the model used to generate the forecasts.
-
prediction_window (optional) - time window used to generate the forecasts (for example "12h").
Custom tags can also be defined by the user.
¶ Fields
Fields are key-value pairs that store the actual time series data. The special field "time" is used to store a timestamp of the value. The other fields are named using physical quantity with unit (measurement type) and store the physical values. Field values can be texts, numbers or booleans.
¶ Ingestion API
To push time series data into the system the Ingestion API can be used. A guide on how to do this can be found here: Ingestion_API. An example data point that you can insert looks as follows:
{
    "measurement": "energy_meter",
    "fields": {
        "time": "2024-01-01 00:00:00",
        "energy_kwh": 1000
    },
    "tags": {
        "asset_name": "building1",
        "direction": "in",
        "domain": "electricity",
        "measurement_type": "energy",
        "type_data": "real"
    }
}
It represents the energy consumption of the building named "building1" at 2024-01-01 00:00:00. The "fields" and "tags" are the data elements described in the previous sections. The "measurement" here is the general name of the sensor from which the data comes. Use the same name for similar data. For example the "energy_meter" name indicates that the data comes from an energy meter and the name "heat_meter" would mean that the data concerns heat. You can see the full list of allowed names using the requirements endpoint of the Ingestion API.
¶ Measurement Configuration
You have to configure the metadata of your measurements such that the system can use your data properly. Each measurement is defined by a unique combination of:
- sensor name (the "measurement" value in the Ingestion API)
- measurement type (the name of the field other than "time" in the Ingestion API)
- a set of tag keys and values
It means that the data points in one measurement differ only in field value and timestamp. For example the measurement of the point defined in the previous section is defined by:
- sensor name: "energy_meter"
- measurement type: "energy_kwh"
- tags:
- "asset_name": "building1"
- "direction": "in"
- "domain": "electricity"
- "measurement_type": "energy"
- "type_data": "real"
If you also have data that differs in at least one of the above elements (for example energy consumption of another asset) you have to configure it as a separate measurement. The configuration can be done in the GUI or via the API.
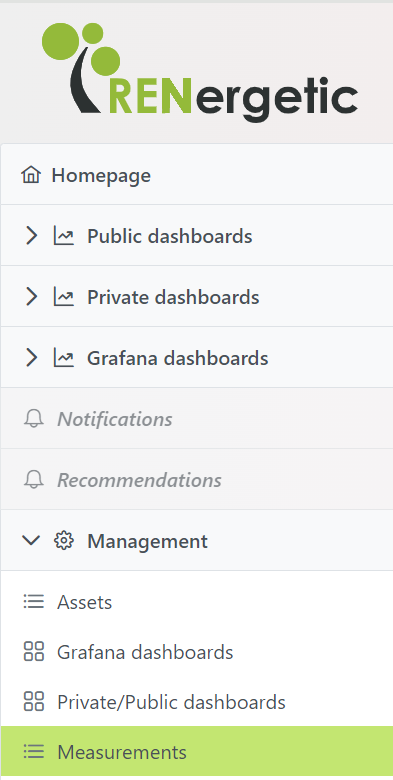
¶ Measurement Configuration in GUI
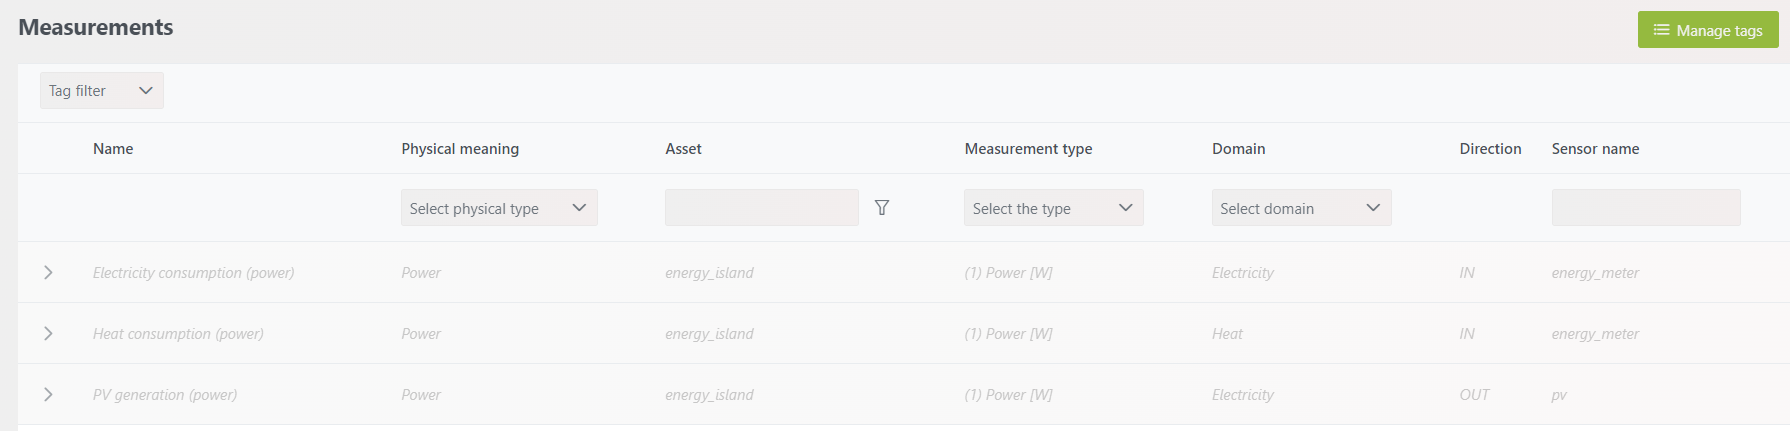
To manage measurements in the GUI go to the Management/Measurements page.
When you open this page, you will see a measurement list, where you can search and filter by each column. Note that the greyed out measurements show measurements, which are currently not used by dashboards or abstract meters.
To configure new measurement, click the "Add" button at the bottom of the page. Then you will see the following window:

The above form is filled out according to the example measurement from the previous section. The meaning of each form field is as follows:
- Name: the name of the measurement must be equal to the measurement_type tag value
- Label: a human readable label of the measurement
- Domain: domain tag value
- Physical unit type and Unit: these 2 fields form the measurement type (the one inside 'field' object)
- Direction: direction tag value (indicating production ("out"), consumption ("in") or neither ("none"))
- Sensor name: the general name of the sensor from which the data comes (the "measurement" value in the Ingestion API)
- Asset: the asset associated with this measurement (which name is equal to the asset_name tag)
To save a measurement configuration click the "Submit" button. If the configuration contains other tags than those included in the above form (other than: "asset_name", "direction", "domain" and "measurement_type"), they must be assigned to the measurement configuration after its creation. In our example it is a "type_data" tag. To do this, find a measurement in the measurement list, expand it and click the button marked with a red frame in the figure below.
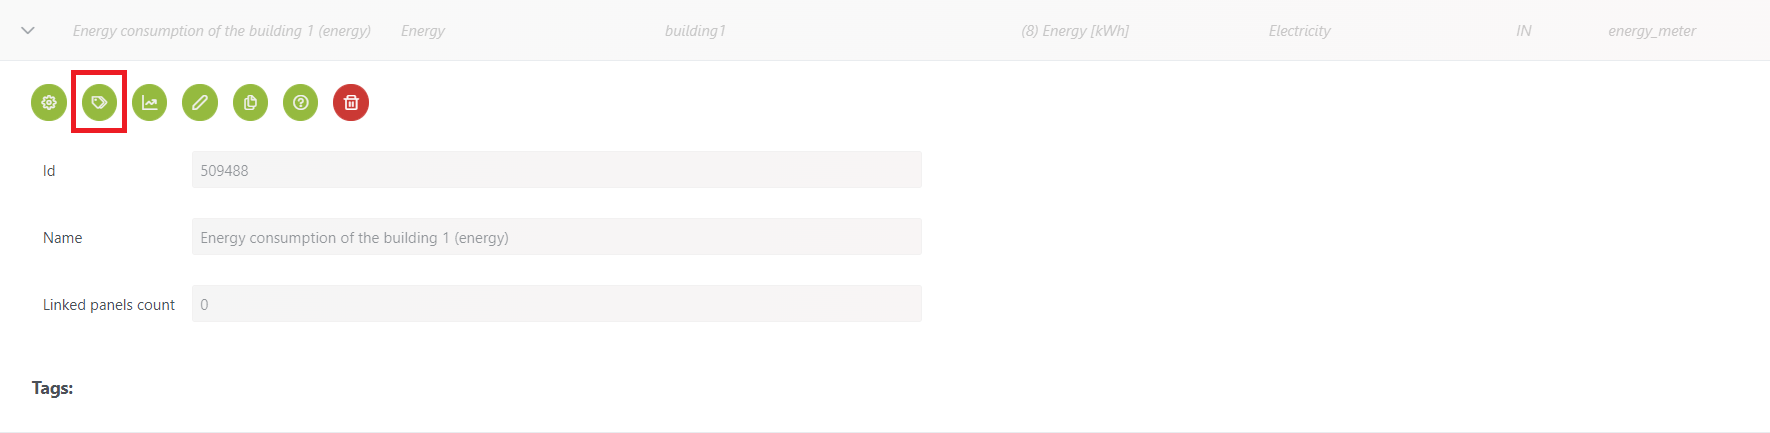
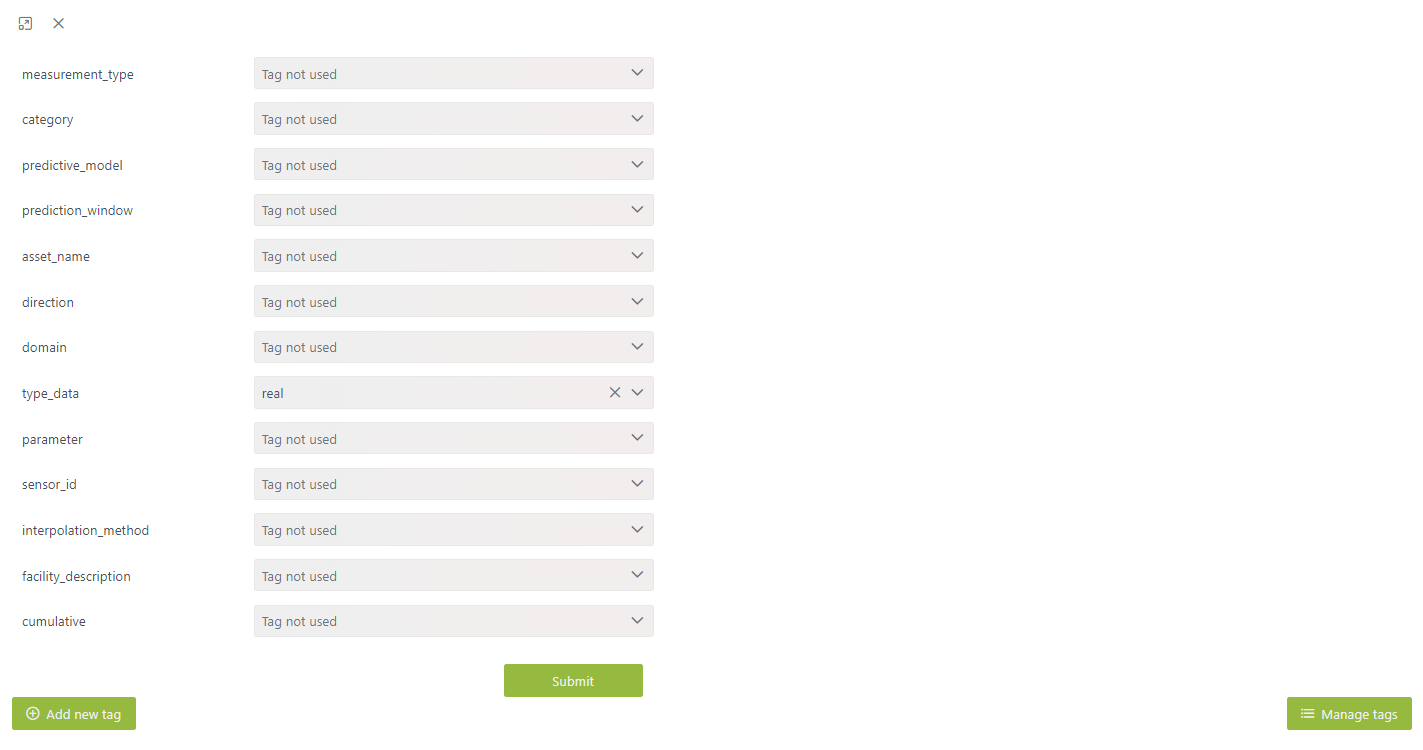
Then you will see the below window, where you can assign a value to the tags that your measurement configuration contains. In this example the value "real" is set to the "type_data" tag. The tags configured before in the measurement configuration window don’t have to be assigned here (i.e. "asset_name", "direction", "domain" and "measurement_type" tags).
If the tag (key or value) that you need is not listed here, you can add it by clicking the "Add new tag" button. In the next section you will find more details about tag management.
¶ Manage tags
Each tag key-value pair that you want to assign to your measurement, have to be configured in the system. In order to do this click the "Manage tags" button on the Management/Measurements page. Then you will see a tag list.
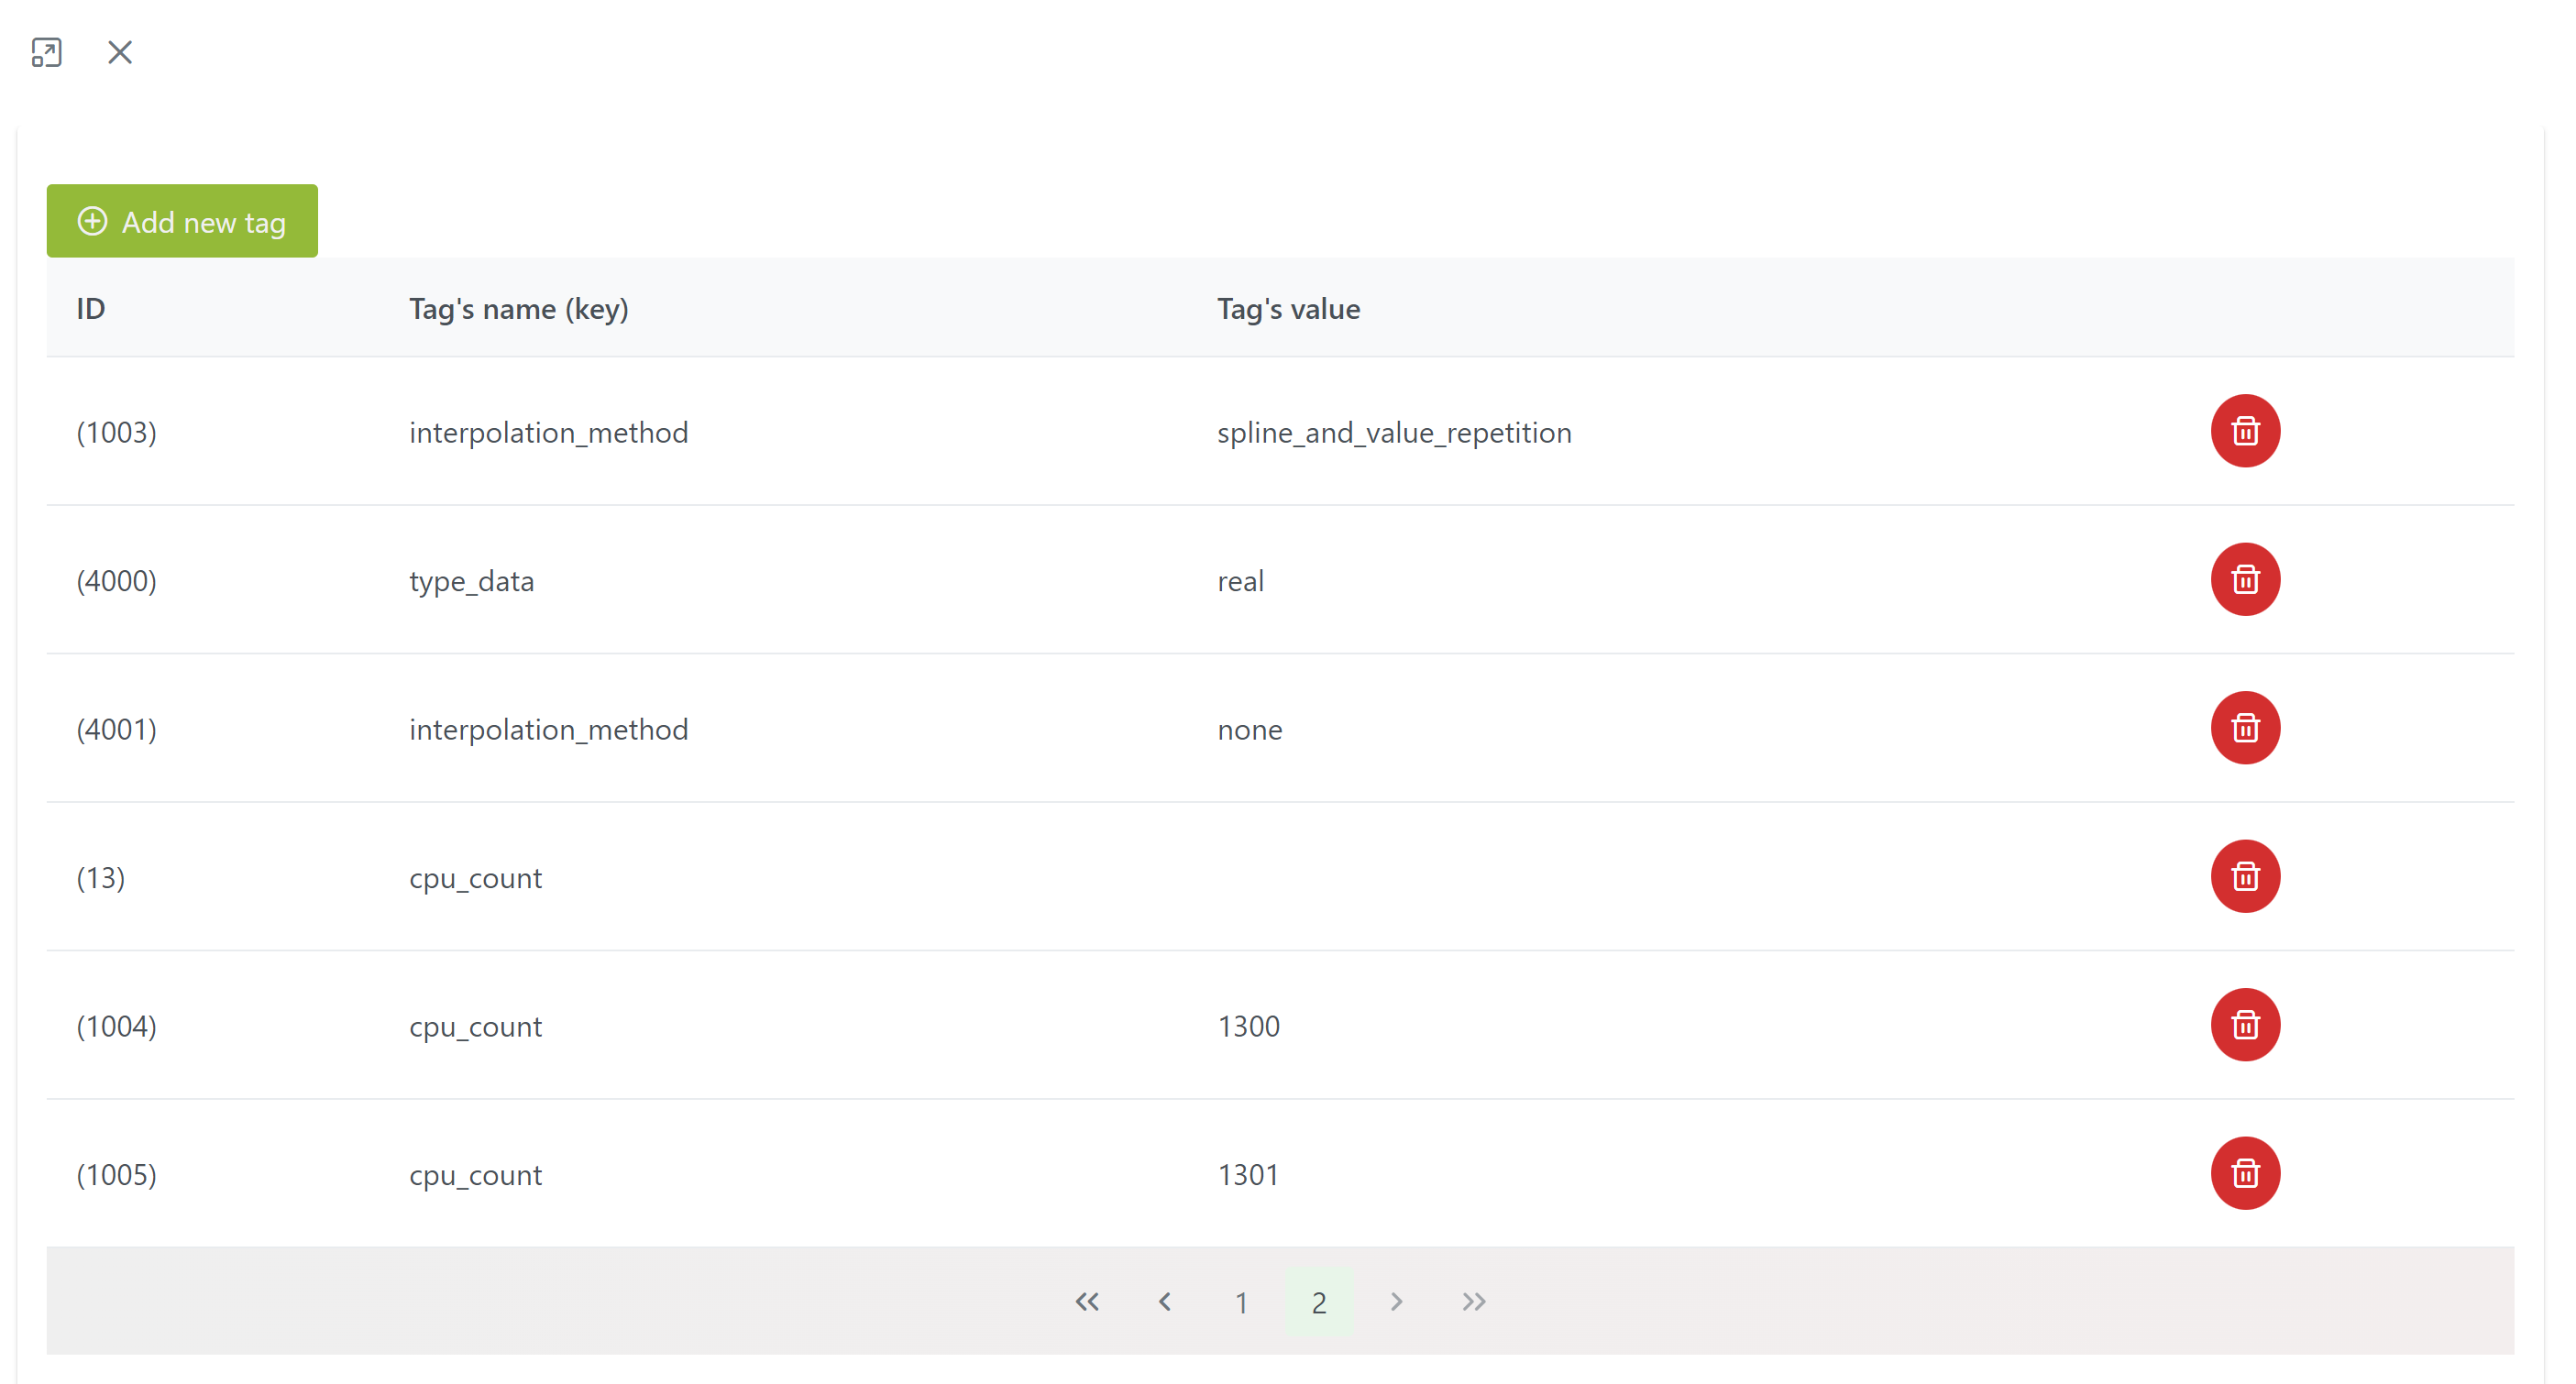
To add a new tag click the "Add new tag" button. Then you will see the following window.

You can select an existing tag key and assign it a new possible value or create a new tag key and assign it some value.
¶ Measurement details
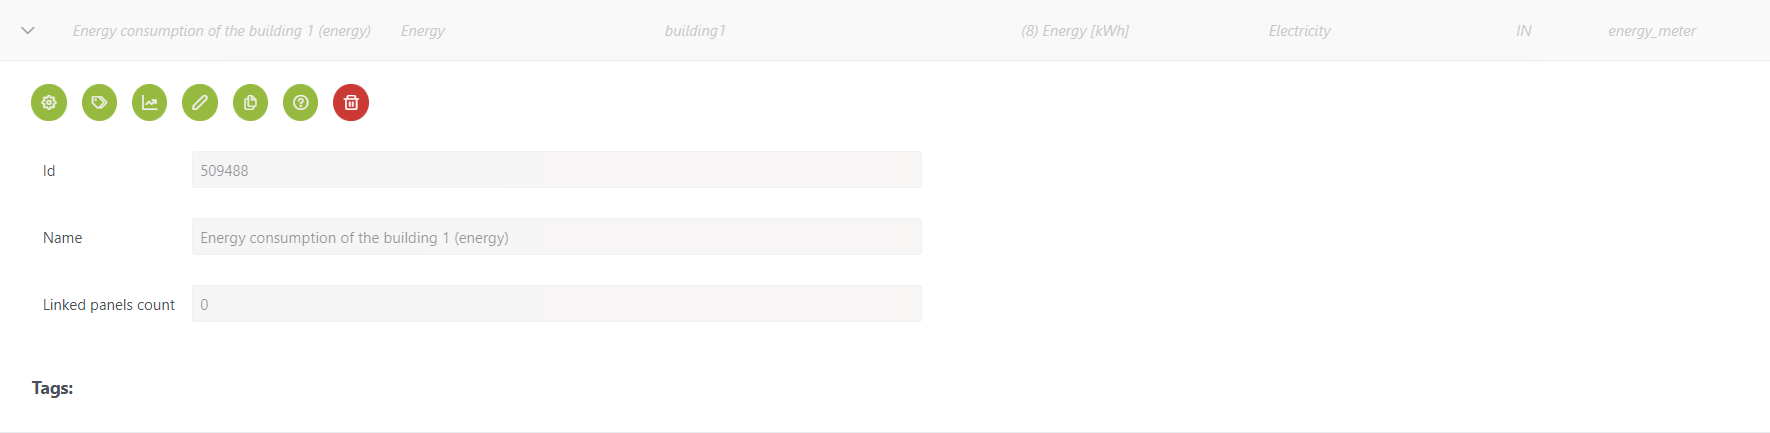
To manage or view details about created measurement, find it in the measurement list and expand it. There you will find the following information:
- Id: auto-generated measurement identifier
- Name: measurement label
- Linked panels count: number of dashboards that display this measurement data
You will also see the following buttons:
![]()
Show details
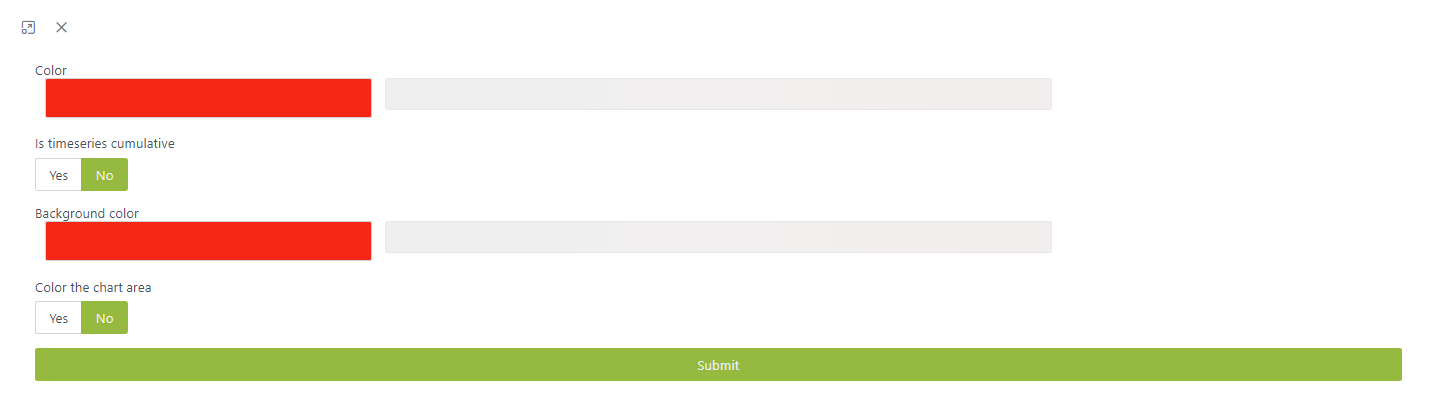
When you click this button, you will see the additional measurement details that you can configure. Most of them are default style values when this measurement is displayed on the dashboard.
- Color: main color of the measurement (e.g. value’s font or chart’s line)
- Is timeseries cumulative: select "yes" if your measurement contains cumulative values, e.g. energy counter which is always increasing and to get energy usage in some period, you need to calculate the difference between counter values at the beginning and the end of this period (if you set this option, the system will calculate the difference automatically when displaying energy usage in some period)
- Background color: default background color of the measurement
- Color the chart area: whether the chart area should be colored
![]()
Manage tags
Use this to assign tags to the measurement. For details see the previous section about measurement configuration.
![]()
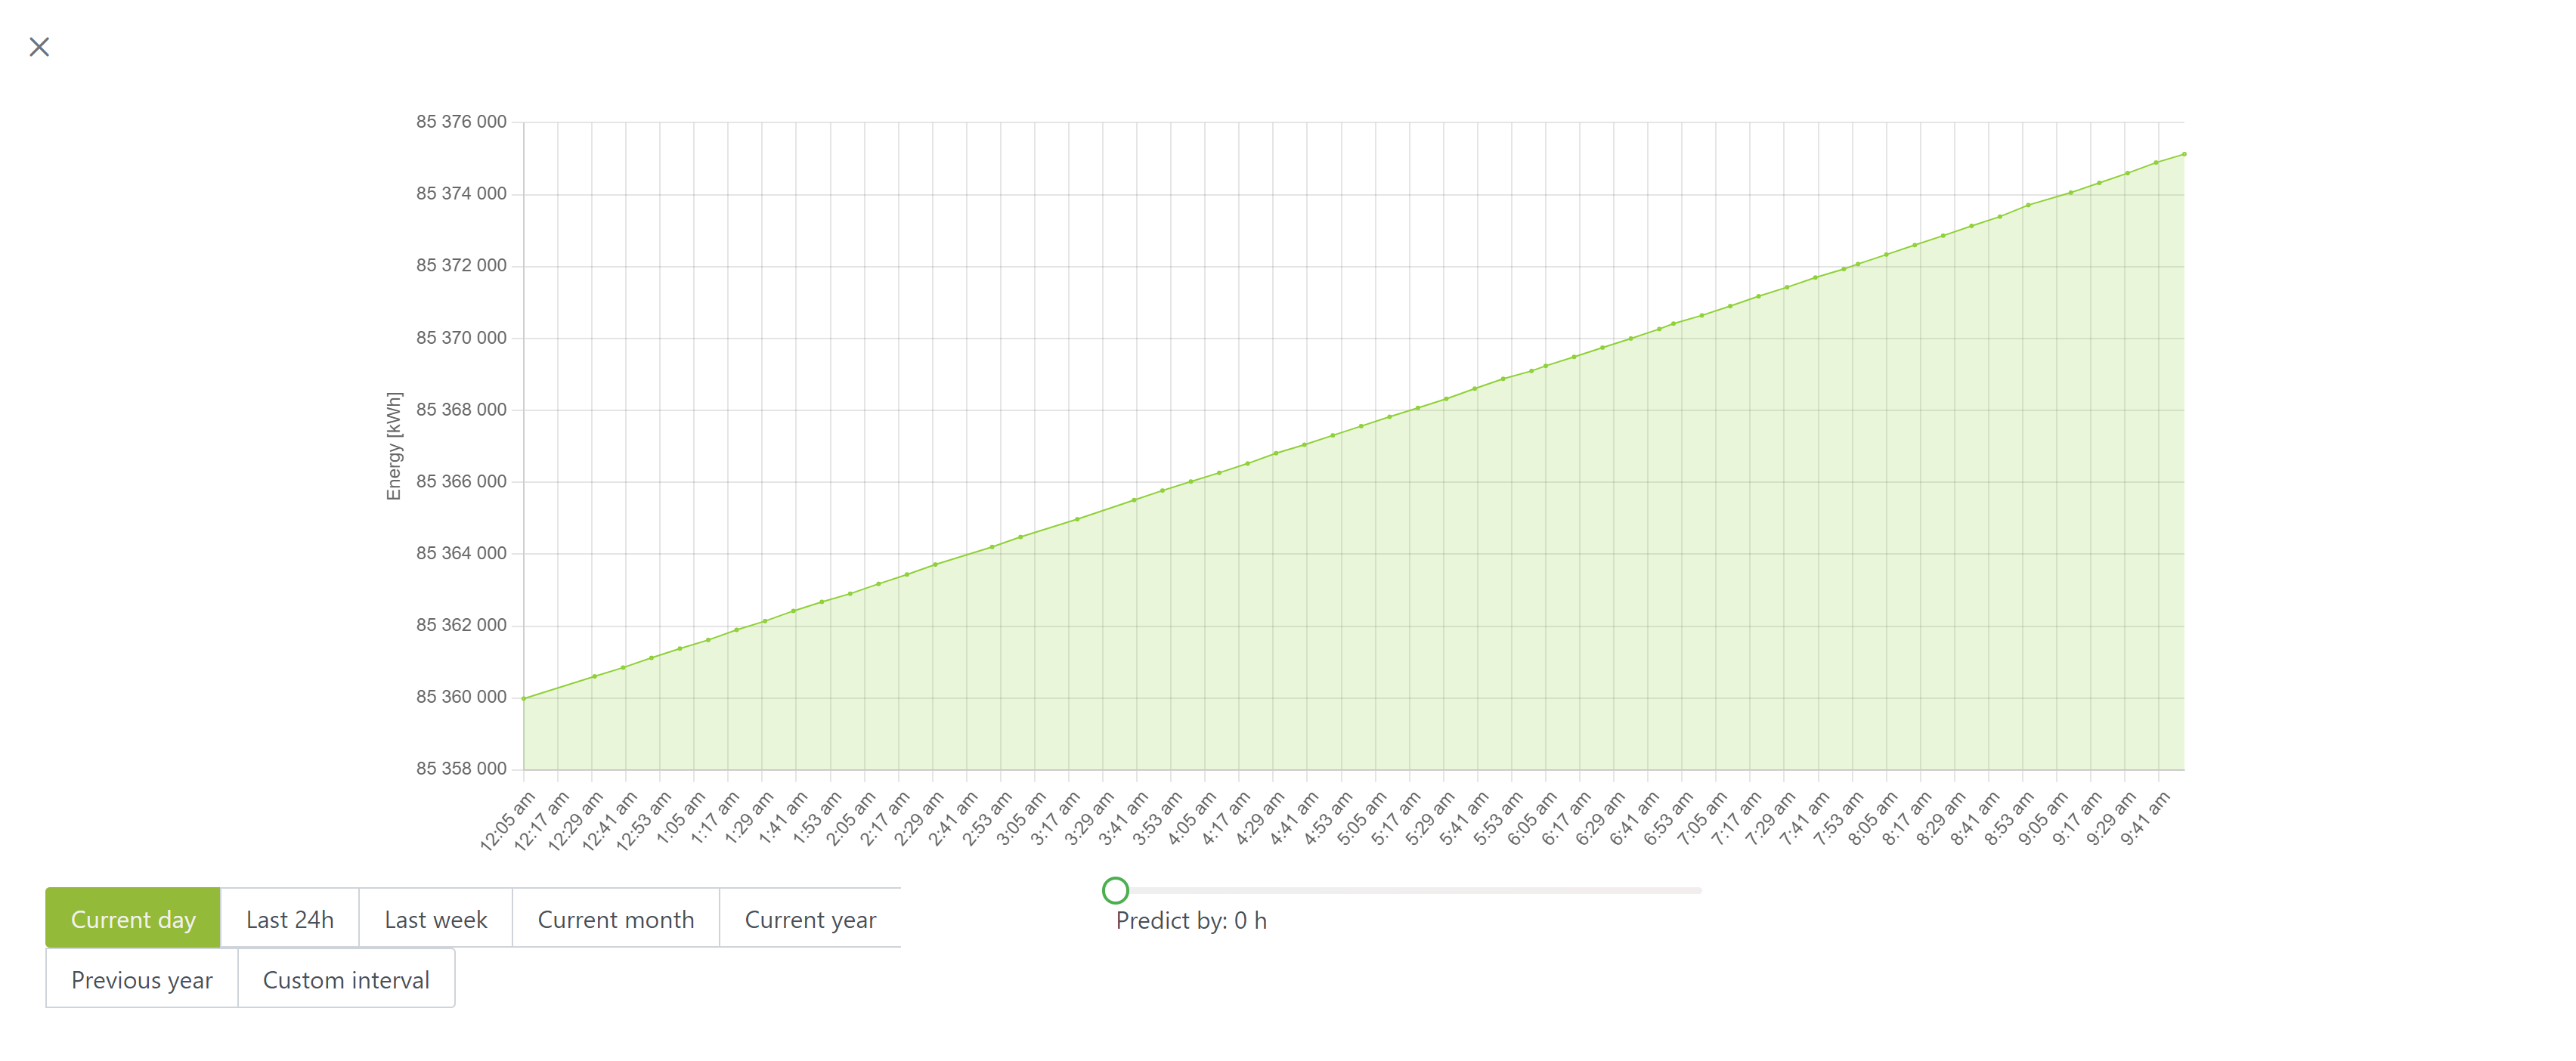
View data
Use this to display values of the measurement on the graph, as it is shown in the figure.
![]()
Edit
When you click this button, you will see the measurement configuration window allowing you to modify the configuration.
![]()
Copy
Creates a new measurement with the same configuration as the current one. This is useful when you want to create a similar measurement to the other, but only slightly change its configuration.
![]()
View json
Displays measurement configuration in a JSON format.
![]()
Delete
This deletes the measurement.
¶ Measurement types
To see a list of all the measurement types, click the "Measurement types" button on the Management/Measurements page. New measurement types can be created using the API (described in the next section) but not in the GUI.
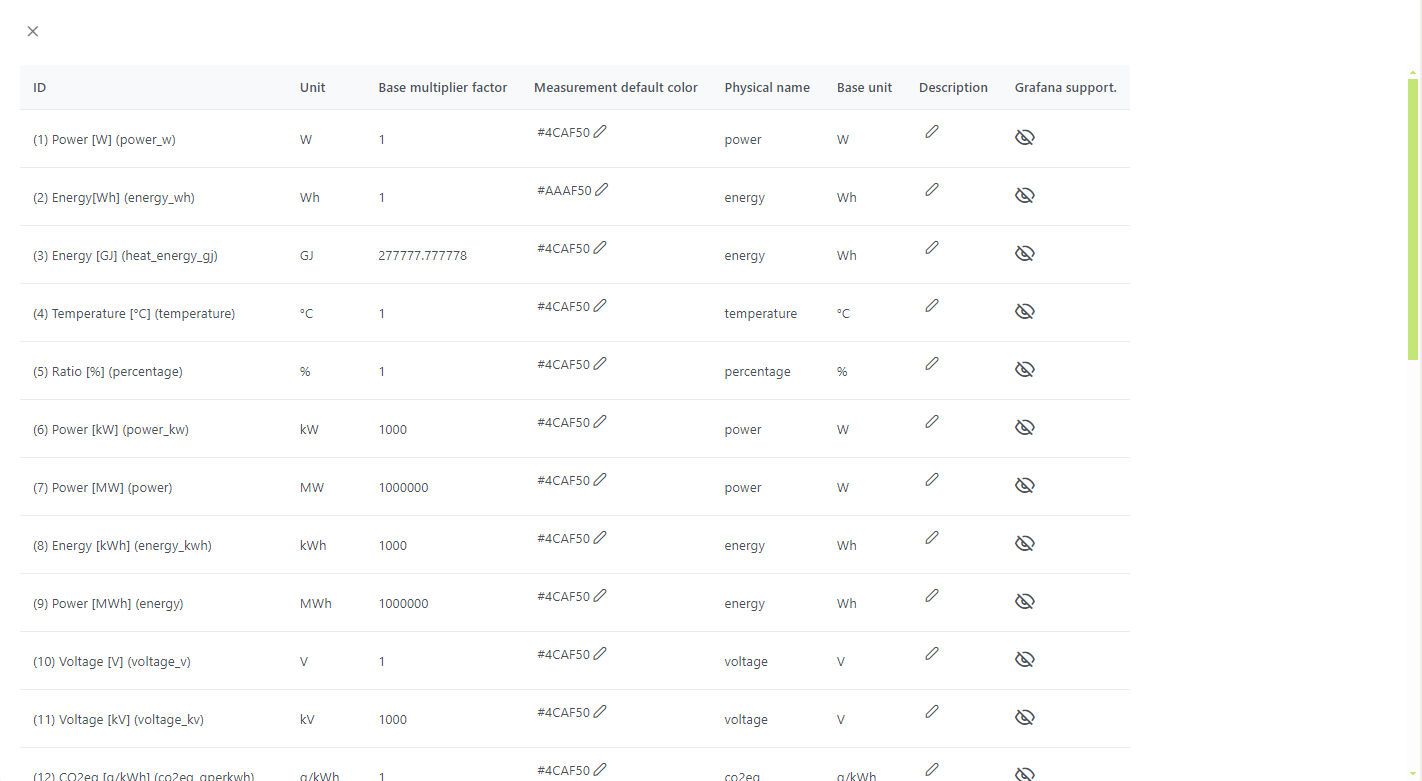
The meaning of the columns is as follows:
- ID: the name of the measurement type
- Unit: measurement type unit
- Base multiplier factor: multiplication factor to the base unit (e.g. when the unit is kW and the base unit is W, the factor is 1000)
- Measurement default color: default color when displaying measurements of this type on the dashboard
- Physical name: name determining the physical meaning of the value
- Base unit: base unit of the values
- Description: measurement type description
- Grafana support: determines whether the type is available/visible in the Grafana dashboard management
¶ Measurement Configuration in RENergetic API
You can also manage your measurements via the Base API of the RENergetic API. You will find a detailed explanation of its endpoints here: RENergetic_API. To use it to configure the sample measurement from the previous section, make the following request:
POST /api/measurements
Request body:
{
    "name": "energy",
    "sensor_name": "energy_meter",
    "label": "Energy consumption of the building 1",
    "type": {
        "id": 8,
        "name": "energy_kwh",
        "label": "Energy [kWh]",
        "unit": "kWh",
        "factor": 1000,
        "color": "#4CAF50",
        "physical_name": "energy",
        "base_unit": "Wh",
        "description": null,
        "dashboard_visibility": null
    },
    "asset": {
        "id": 525046,
        "name": "building1",
        "type": {
            "id": 3,
            "name": "building",
            "label": "Building"
        },
        "label": "Buildings",
        "geo_location": null
    },
    "domain": "electricity",
    "direction": "in"
}
The meaning of the above JSON keys is as follows:
- name: the name of the measurement must be equal to the measurement_type tag value
- sensor_name: the general name of the sensor from which the data comes (the "measurement" value in the Ingestion API)
- label: a human readable label of the measurement
- type: measurement type object that exists in the system. To get a list of such objects make a GET request to the api/measurements/type endpoint.
- asset: object of the asset associated with this measurement (which name is equal to the asset_name tag). To get a list of such objects make a GET request to the api/assets endpoint.
- domain: domain tag value
- direction: direction tag value (indicating production ("out"), consumption ("in") or neither ("none"))
In response to the above request you will get a measurement id. You can use it to update the measurement configuration making a PUT request to the /api/measurements/{measurement id} endpoint and providing body with the same format as above. You can also delete measurement configuration with the DELETE request to the /api/measurements/{measurement id} endpoint.
¶ Tags
If the measurement configuration contains other tags than those included in the above request (other than: "asset_name", "direction", "domain" and "measurement_type"), they must be assigned to the measurement configuration after its creation. It can be done with the following request:
PUT /api/measurements/id/{measurement_id}/tags/key/{tag_key}/value/{tag_value}/
In our example we have to assign a "type_data" tag:
PUT /api/measurements/id/{measurement_id}/tags/key/type_data/value/real
The above request assumes that a tag key-value pair is configured in the system. To add a new tag to the system, make the following request:
POST /api/measurements/tags
Request body:
{
    "key": "type_data",
    "value": "real"
}
¶ Measurement details
You can also assign additional key-value pairs to the measurement (measurement details). The system uses the following keys (most of them are default style values when a measurement is displayed on the dashboard):
- color: main color of the measurement (e.g. value’s font or chart’s line) in RGB format, example value: #473131
- cumulative: set this to "true" if your measurement contains cumulative values, e.g. energy counter which is always increasing and to get energy usage in some period, you need to calculate the difference between counter values at the beginning and the end of this period (if you set this option the system will calculate such a difference automatically when displaying energy usage in some period)
- background: default background color of the measurement in RGB format, example value: #5c1e1e
- fill_chart: whether the chart area should be colored ("true" or "false")
To add a measurement detail use the following request:
POST /api/measurements/{measurement_id}/info
Request body:
{
    "key": "cumulative",
    "value": "true"
}
¶ Measurement types
To create a new measurement type, make the following request:
POST /api/measurements/type
Request body:
{
    "id": 8,
    "name": "energy_kwh",
    "label": "Energy [kWh]",
    "unit": "kWh",
    "factor": 1000,
    "color": "#4CAF50",
    "physical_name": "energy",
    "base_unit": "Wh"
}
The meaning of the above JSON keys is as follows:
- id: unique identifier of the measurement type
- name: the name of the measurement type
- label: a human readable label of the measurement type
- unit: measurement type unit
- factor: multiplication factor to the base unit (e.g., when the unit is kW and the base unit is W, the factor is 1000)
- color: default color when displaying measurements of this type on the dashboard
- physical_name: name determining the physical meaning of the value
- base_unit: base unit of the values